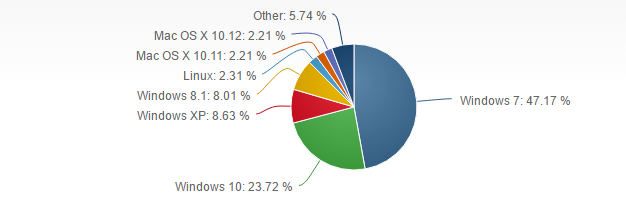
*Special Note: This guide covers malware removal for Windows versions 7, 8, 8.1 and 10. We cannot guarantee that these methods or software will work for earlier Windows versions.
Let’s face it: Malware is pernicious, annoying, and quite often dangerous. If you’ve been poking around on internet-connected computers for a while, there’s a very good chance you’ve gotten at least one of the hundreds of millions of malware floating around. This is even more true if you’re a Windows user. Windows operating systems are running on over 90 percent of all computers currently in use, making them a larger target for cyber criminals and bored internet troublemakers.
You’ve also probably heard (most likely from a smarmy Mac user) that Macs don’t get viruses. That’s simply untrue. Every operating system is susceptible to viruses. As Bitdefender CEO Bogden Botezatu explained in a 2015 Digital Trends article:
Mac OS X software has more high-risk vulnerabilities than all versions of Windows put together. Apple markets these products as virus-free. They say you don’t need an antivirus because they know people hate antivirus software. These utilities often slow down your computer, so they don’t want to promote them.
Ouch. So much for that myth.
What is malware?
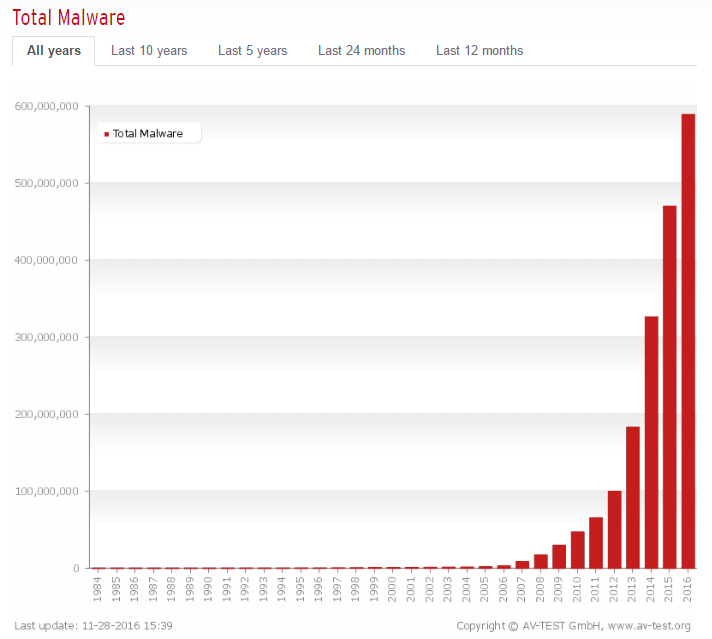
“Malware,” (short for malicious software) is the broader term for any malicious program that could potentially mess with your computer. Malware is pretty much everywhere. You can get malware from software you download, even from seemingly safe and reputable websites. You can get it from suspicious links in emails. Advertisements on web pages aren’t even safe. You can even get it from USB flash drives you find on the sidewalk (ok, that one might be obvious). In short, malware is almost as prevalent as regular software, with nearly 600 million known malware in existence as of 2016.
While the number of new malware programs entering the market fell in 2016, there’s no reason to believe that malware will completely go away anytime soon, if ever. If anything, the total number of malware produced may decrease, while those that are created become increasingly more sophisticated and difficult to destroy.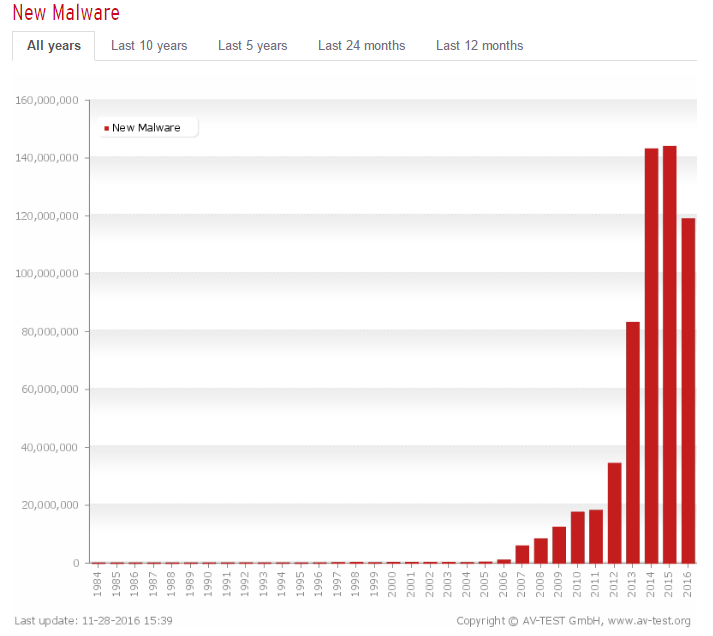
This leads us to the obvious question: What’s the best way to remove malware? You could invest in a good real-time antivirus program. However, note the data we listed above on the sheer number of malware out there and on how many new ones are added each year. Real-time antivirus software simply won’t cut it when it comes to stopping and removing all malware. So when you do end up contracting a virus — no virus shaming here, it happens to the best of us — your next best move is an on-demand malware remover.
Preferred Rootkit removal tool: Malwarebytes Anti-Rootkit

Preferred on-demand malware scanner: Zemana AntiMalware

Although Zemana missed a few of the test malware, it found all of the real malware we downloaded for the test. The interface is clean and efficient, and the fully-featured antivirus suite is extremely effective at not just removing nasty malware and adware, but actually preventing you from downloading them in the first place.
We also tested on-demand scanners from the following providers:
HitmanPro
AVG (Anti-Malware)
Windows Defender
Malwarebytes (Anti-Malware)
Bitdefender (Adware Removal Tool)
We found varying success with each of these, including the overall benefit they provide beyond on-demand malware scanning.
Know the signs of an infection
Not all malware will make themselves known very readily. In fact, many, such as keyloggers, are designed to mask their presence. Other malware will make themselves known indiscriminately. Ransomware is a perfect example of this, although many may not be designed to steal anything from you, but to wreak havoc on your system such that it’s wholly unusable.
Common signs of a malware infection include:
- Your internet browser homepage has changed, often to a website that is unfamiliar
- Lagging or freezing on your system or web browsers
- You are unable to connect to some websites, despite a working internet connection
- Certain functions within different programs stop working
- Some programs simply won’t load
- Popups appear on your computer without warning
- Your computer restarts by itself
- Your computer will not restart, and your access to your Start button has been restricted
- Unfamiliar toolbars appear on the top of your web browser
- You cannot access important functions, such as the control panel, task manager, registry editor, or the command prompt
Most viruses are designed to keep you from getting rid of them. At times, it can be like playing a game of cat and mouse, only the mouse is wearing an invisibility cloak. If your usual attempts to find out whether you actually have a virus are actively being thwarted, it’s best to assume that you indeed have one.
Some hardware issues may cause symptoms very similar to malware. For example, a lagging or slowing system may be caused by a dead fan instead of a piece of malicious software dragging down your computer’s resources. Nevertheless, it’s best to assume you have some form of malware instead of ignoring the signs.
First option: Run a virus scan with your real-time antivirus software
If you have a real-time antivirus program, it likely has an included virus scanner. Your first step is to utilize the resources you have on hand and run the virus scan. We suggest that you run the deepest level scan available through your program. Some programs provide scanning options that range from a quick scan of only a handful of file folders to a holistic scan that covers every single file on your computer. Opt for the larger scan. It will take longer (often upwards of a half hour or more), but it may be worth it.
You’ll find one of three results here:
- Your real-time virus program discovers the problem(s) and allows you to either delete it or quarantine it
- Your real-time virus program fails to discover a virus of malady of any sort
- Your real-time virus program is blocked from performing the scan at all
This may actually be a good time to discuss the difference between quarantined and deleted files. Most malware or virus removal programs will quarantine malware first, and then give you the option to delete them. Quarantined files remain on your system, but are, in effect, cut off completely from the rest of your computer. This may be troubling to some users, especially if the virus was particularly damaging and dangerous.
However, it’s important to note that file systems are often interconnected. Some viruses work their way into your system and make themselves difficult to fully delete without affecting your entire file system. A quarantined file has its access cut off, but you may find that your virus software quarantined files that should have been left alone.
If you do find your computer quarantining a lot of files, check the files before deleting them. Only de-quarantine files if you’re sure they’re not malware, and only delete them if you’re positive the deletion won’t damage your system in some way. That said, it’s good to remember that you can always reinstall a severely infected program. In many cases, your antivirus software comes with the option to repair files damaged by malware. This helps ensure you won’t have to delete some programs wholesale and reinstall. Still, there may be times when you need to resort to that.
Second option: Backup your files and perform a system restore
Microsoft actually includes a function to restore your computer to a previous state. In some cases, this will remove certain malware that have infected your registry. While system restore primarily restores your registry to an earlier state, even to the point of deleting some files, this may not actually impact some of your infected files. This means that malware may still be there after the restore. Indeed, you may actually find that this worsens the problem with some malware (a situation I’ve experienced). However, there are malware that specifically target your registry that can have their work undone through this method.
We do not recommend this as your end-all method, but as a potential option to be used with on-demand malware scanners or other virus removal methods. I will say that I have used this method effectively myself, but not in isolation to other methods. You can use this as a means to combat a virus that has made changes to your registry by reverting your registry back to a previous state before the damage occurred, but the virus may indeed have pre-existed your restore points. Many malware have set conditions to which they activate, acting very much like some real viruses that show no symptoms for a long time before they begin to do their dirty work on your system.
Again, before performing a System Restore, first back up your files. Use whatever backup program you have, or backup to an external hard drive. Additionally, before you continue, if your computer was not set up to already create restore points, this will not work for you at this time. Also note that you may not want to backup your entire system, only your important documents and files. After all, if your computer is infected, a whole system backup may well backup the malicious software.
To perform a Windows System Restore, do the following:
Click on the System Protection tab
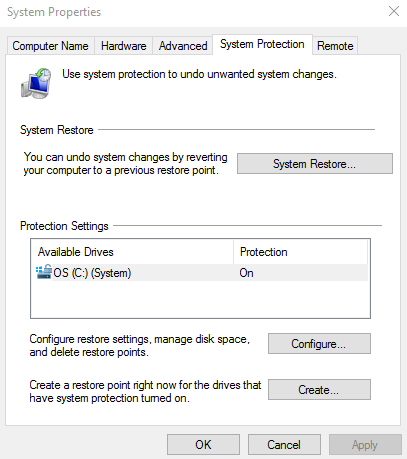
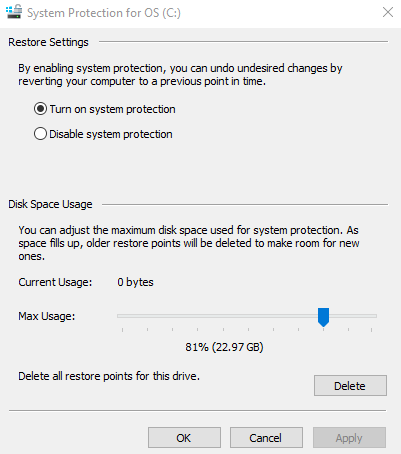
Click on System Restore. If System Restore is grayed out, this means you do not have restore points currently set up. You will not have any to revert to. However, you may desire to create some now, or later if you suspect you have a virus on your system. You can do this by clicking on “Configure”, and then clicking on “Turn on system protection”. You will also need to adjust the slide bar so that your computer can devote some disk space to creating a restore point.
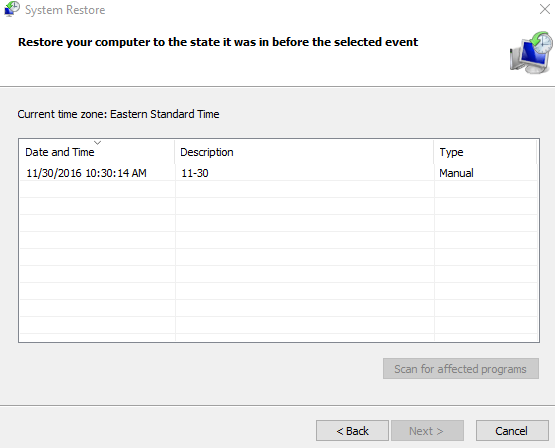
You can perform a scan for programs and drivers that will be deleted as a result of your system restore.
Perform your system restore. You will likely need to reset your computer to finalize any changes.
If this works for you, fantastic! However, we still suggest running one of the on-demand malware scanners detailed below for the reasons we gave earlier. This will ensure that you actually got rid of the root problem and any other problems that may be hiding on your system. Of course, if you have a truly advanced malware on your system, it likely prevented you from performing this action at all.
Third option: Use an on-demand malware scanner
If your malware issue brings you here (hopefully it didn’t), you’re truly on your last leg with the malware plaguing your system. Thankfully, you do still have a few great options for removing malware. Below you’ll find the details of several on-demand malware removers we tested. To make it more authentic, we downloaded real and test malware. In case you’re wondering (and we know you are), we took precautions by utilizing a sandbox before doing all testing.
After some investigation and testing, we went with Time Freeze for this. Time Freeze creates a sandbox partition out of your entire system, and upon reset, reverts your system back to where it was before you turned on the program. Call us safety nuts, but we wanted to make sure we didn’t ruin our own computer in the process, while still providing an authentic virus removal process for our readers.
We put the following programs to the test:
- Zemana AntiMalware
- Malwarebytes Anti-Rootkit (Beta)
- Malwarebytes Anti-Malware
- HitmanPro
- Kaspersky TDSSKiller
- Bitdefender Adware Removal Tool
- AVG Malware and Adware Removal Tool
- Windows Defender
For reference, we downloaded a few free test viruses from EICAR and a host of real ones listed by nictatech software, malshare.com, and Zelster.com . We don’t suggest using real viruses to test for yourself unless you take the proper precautions first. We also suggest you do not try out the most dangerous malware out there. We restricted ours to malware that would only infect our system, and not attempt to spread to others.
You may need to start in Safe Mode
Feel free to skip this section if you are able to access the internet on your infected machine and are able to download and run programs. However, if your malware has mostly or completely cut off your access to certain programs, you may need to do one of two things:
- Restart your computer in Safe Mode
- Restart your computer in Safe Mode with Networking
Whether you choose one or the other depends on your situation. If you’re afraid the malware on your computer is sharing your information through an internet connection, use Safe Mode. If this is not a concern, or your malware has impacted other functions but you don’t believe it’s sharing info, utilize Safe Mode with Networking. Safe Mode opens up your operating system with a very limited number of files and drivers. There’s a good chance that Safe Mode will cut off whatever malware is bugging your system.
“Can I just keep it in safe mode all the time?”
Yes and no. You can do this, but you don’t really want to. Safe Mode is extremely limited, so even if it keeps your computer running and working in Safe Mode without the malware, you won’t actually be able to do much with it. Safe Mode was essentially designed for the exact purpose you’re not using it for: getting rid of malware.
To open up Safe Mode in Windows 7 or 8, do the following:
- Reset your computer
- Immediately upon power up, press the F8 key in one-second intervals
- Windows should now load the “Advanced startup” options.
- Select either “Safe Mode” or “Safe Mode with Networking”. As you may not have an on-screen mouse, you can do this by using one of the function keys. This should be indicated on your screen, however, it will likely be F4 to enable Safe Mode and F5 to enable Safe Mode with Networking.
Unfortunately, Microsoft does away with the easy method for Windows 10. Additionally, they’ve added a security feature called BitLocker that requires you to input a long key in order to actually enter into safe mode. You’ll want to acquire your key from here first before attempting to open safe mode in Windows 10.
To open up Safe Mode in Windows 10, do the following:
Option 1: While logged into your computer
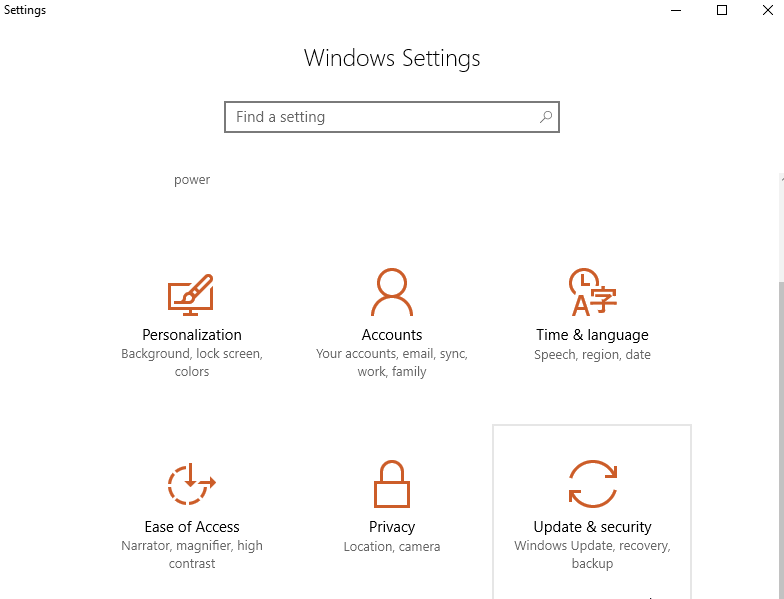
Press the Windows logo key and the “i” button on your keyboard at the same time. This will open up your “Settings”. You can also find settings from the Start menu on the lower-left corner.
Select Update & security, and then Recovery
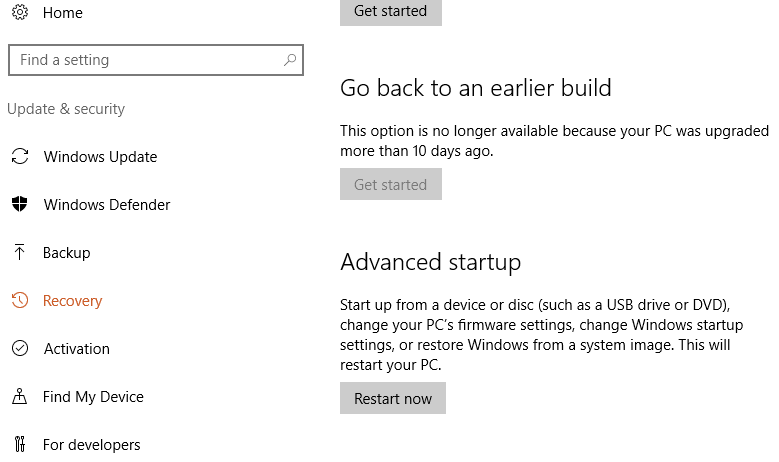
After your computer restarts (yet again), you’ll now get your list of options. Select 4 or hit F4 to start your computer in Safe Mode. If you need to use the Internet, select 5 or F5 for Safe Mode with Networking.
Option 2: From the sign-in screen
- Restart your computer. When the sign-in screen loads, hold the Shift key down and select the Power icon (usually on the bottom right). Now select Restart.
- After your computer restarts, you’ll see the Choose an option screen. Click on Troubleshoot , then on Advanced options. Finally, go to Startup Settings and then Restart.
- After your computer restarts (yet again), you’ll now get your list of options. Select 4 or hit F4 to start your computer in Safe Mode. If you need to use the Internet, select 5 or F5 for Safe Mode with Networking.
You’ll know your computer is in Safe Mode when you see the words “Safe Mode” on all four corners of your screen. Some programs won’t work in Safe Mode. Most antivirus or anti-malware programs will recognize that you are in Safe Mode and run a special “Safe Mode” operation.
For AVG, scanning in Safe Mode occurs through the command prompt instead of with a graphical interface. This is a notable difference in how much Windows is pared down when in safe mode. If you’re into that kind of thing, you can watch the program cycle through your files in command prompt. However, it takes a good while, even with the quick scan option.
As stated elsewhere, run Safe Mode if the malware has taken over too many parts of your system, or if you’re afraid it’s sending off data elsewhere through your internet connection.
Start with a rootkit killer to unmask hidden malware
Earlier, we stated that most malware are designed to hide in your system. They typically accomplish this through a rootkit. A rootkit is a separate set of software that allows the malware to hide undetected in your system. Rootkits can do things such as silently change your system processes and even install drivers that also remain hidden on your computer. All of this is to serve the purpose of the malware it was designed to help operate.
A rootkit works by finding vulnerabilities in your system and exploiting them. Specifically, a rootkit will gain administrator privileges over your system. This is why it’s able to hide from sight, in some cases due to the fact that it’s gained escalated administrator powers that you may not even have on your own computer (or taken these privileges and then locked you out).
It’s best to start your malware removal process with a rootkit killer, as some malware may easily evade your real-time virus protection software and any on-demand malware scanners you employ. Rootkit killers may not always delete or quarantine the entire malware. They cannot undo all of the harm done by a rootkit and its associated malware. Their main purpose it to just reveal malware to make them easier to get rid of. Microsoft actually suggests wiping and reinstalling your entire system if you locate a rootkit.
We tested one of the most popular rootkit killers for this purpose, TDSSKiller from Kaspersky Lab and the lesser known, Malwarebytes Anti-Rootkit (Beta version) tool. We downloaded a few, real malware to see of either would root out any rootkits.
Kaspersky Lab TDSSKiller

Kaspersky Lab TDSSKiller is an extremely popular and often used and tested rootkit killer. Many security professionals turn to this one when testing malware samples.
To use TDSSkiller, do the following:
Go to the Kaspersky Lab utility download page.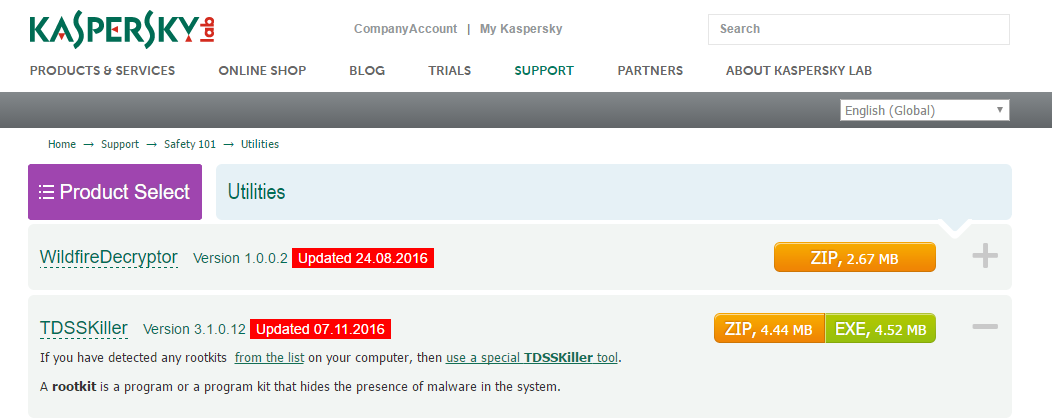
Click on the right to download TDSSkiller.
Install TDSSKiller from wherever you save your files.
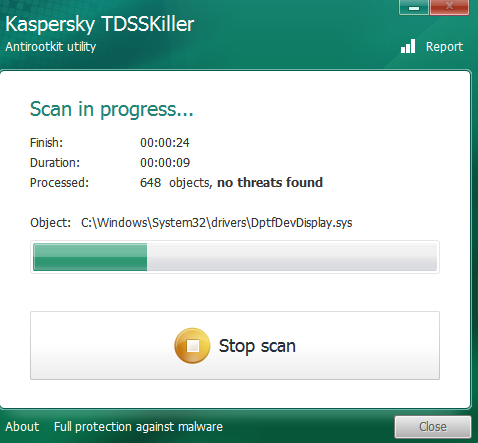
TDSSkiller is fast–and that’s part of the problem. It took under 30 seconds and found nothing. Sad. Through research, we’ve discovered that it has been known to fail at finding malware.
TDSSKiller does indeed lack some depth in its search, so we weren’t too surprised that it didn’t find any malware. We even turned on the deeper level scanning available through TDSSKiller (which requires a system restart). That scanned slightly more files, but still not deep enough to discover anything on our system. 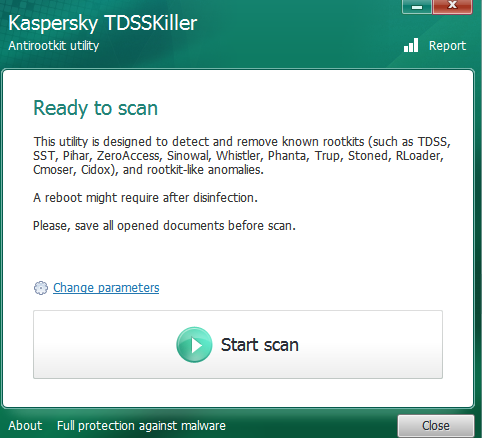
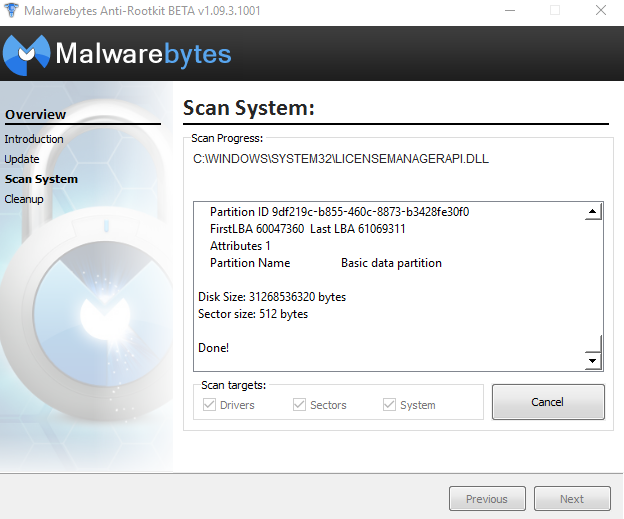
Malwarebytes Anti-Rootkit

Malwarebytes is a well-known and well-respected anti-malware company. Their Anti-Rootkit tool is still in beta, so it’s good to take it in stride.
To use Malwarebytes Anti-Rootkit, do the following:
Go to the Malwarebytes Anti-Rootkit download page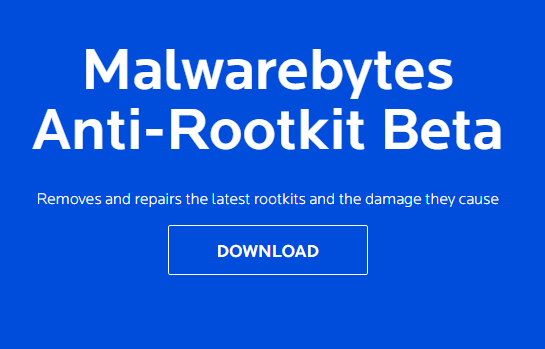
Click the very large download button
Install the file from wherever you send your downloaded files
This Malwarebytes program executes rather quickly once you get past the Introduction and Updates. Scanning the system, however, is slow. It took about 20 minutes to scan the entire file system. It did a thorough job nonetheless, as it found four malware on my system, in contrast to the zero found by TDSSKiller. This is a case where patience is a virtue, especially if you click to create a restore point before cleaning the malware. That took another 10 minutes. When all was said and done, I spent around a half hour with Malwarebytes Anti Root-Kit.
On a second test, both Malwarebytes and TDSSKiller found no malware. This may have been due to a lack of rootkits in our second round of malware testing. Nevertheless, it’s important to remember that a rootkit tool has a very specialized purpose, so if it finds nothing, that does not mean there is nothing there. The malware scanners found malware in the second test, which adds to this statement. Unfortunately, after our first test the screenshots got corrupted (go figure). We took extra precautions during the second test to preserve the screenshots.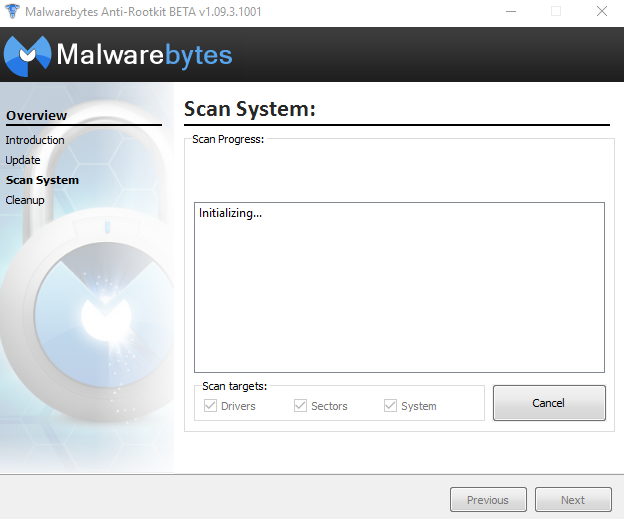

Utilize an on-demand Malware scanner
to finish the job
There are a large number of these on the market. We took a look at several of them. To ensure no crossover, we wiped our sandbox after each test. The only exception was when we tested the rootkit killers. We tested both initially without removing any malware they discovered. As its unlikely you’ll run into the same malware twice, we tried to vary the different malware we installed, downloading a random selection of different malware to try, including some ransomware and some adware.
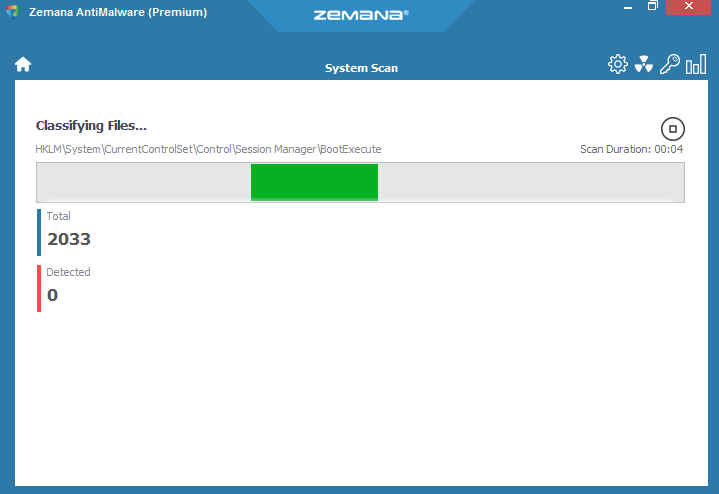
Zemana AntiMalware

Zemana is a paid program that offers a 15-day free trial. Unlike many free trials, Zemana doesn’t lock out any functionality in the trial version. Every feature is usable.
To get Zemana, do the following:
Go to the Zemana AntiMalware download page
The file will download automatically. You can also find a download link on the page
Once installed, you can immediately run scans. Zemana takes a few minutes to scan in most cases. However, those with particularly large and packed file systems should expect a long-ish scan. The more malware in the system, the longer the scan will take.
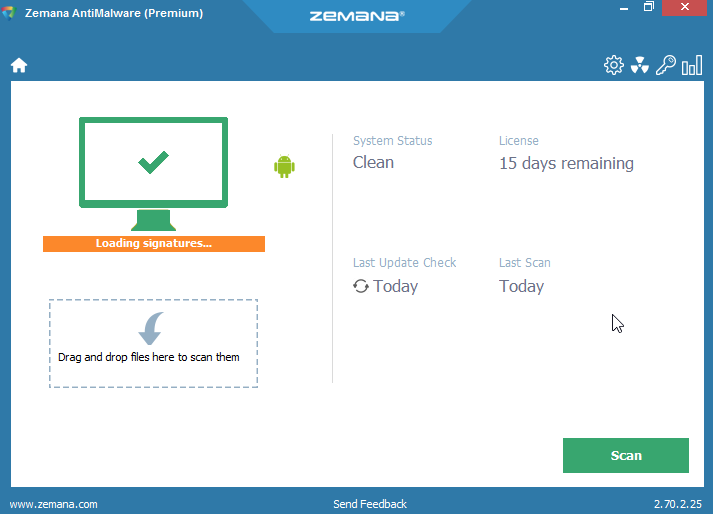
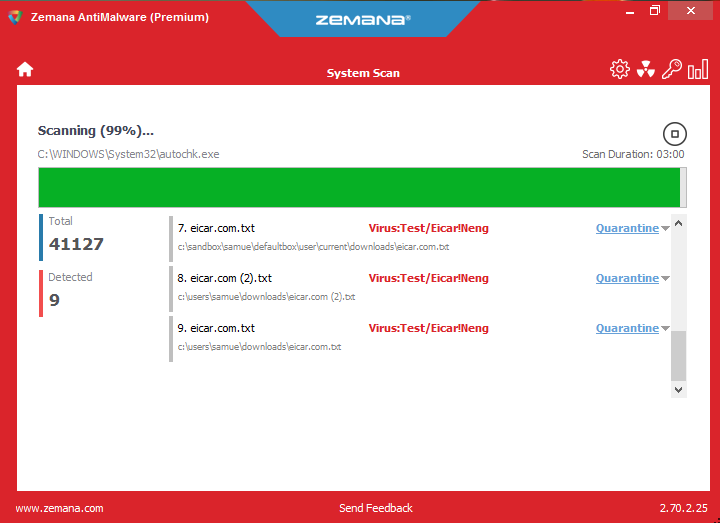
On our first test, Zemana found 19 pieces of malware on our system. Yikes. The software gives you the option to “Repair” affected programs, “Quarantine” malicious programs or “Delete” those programs. You can also exclude any programs or files before you do a cleanup. All files cleaned up nicely and were easily quarantined and then removed.
One piece of malware we installed was one that changed our web browser startup page, a common malware tactic. Zemana completely repaired this issue fast and easy. Zemana also offers real-time malware monitoring. It was easily blocking our attempts at downloading malware. So, it worked as intended, even when filtering. We actually had to turn Zemana off at one point, as the real-time monitoring stopped us when we wanted to download malware on purpose (for science).
Unfortunately, Zemana did not discover the test EICAR malware couched in a zip file. This was an important test to see if the software could detect semi-hidden malware before it got unzipped, a test Zemana did not pass.
Hitman Pro

Hitman Pro offers a free-to-try malware removal tool. The base program is free to download, although you will need to acquire a free one-time license to remove any malware with the free version.
To get HitmanPro, do the following:
Go to the HitmanPro website and download the 30-day free trial

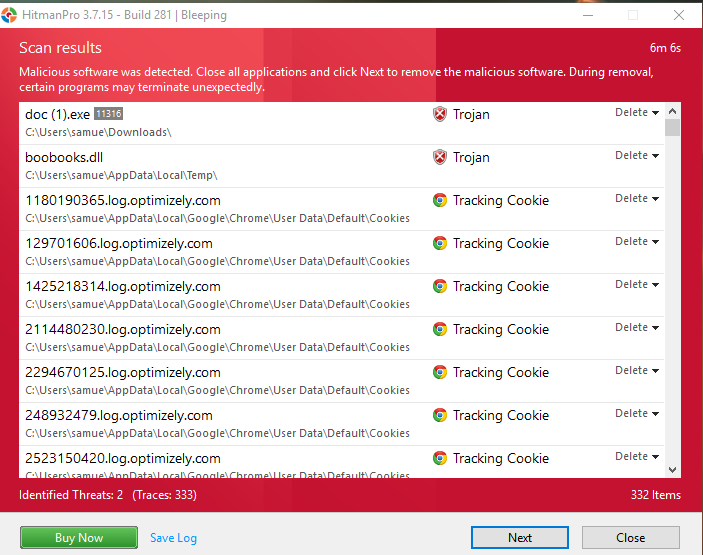
We found that while HitmanPro took just under 5 minutes to scan and found the exact malware we’d installed, the scanner also identified a load of tracker cookies it considered malicious, which we hadn’t purposefully downloaded. It should be noted that tracker cookies are common, even from reputable websites, and are generally nothing to be too concerned about. 
After finding your malware, HitmanPro will take a few minutes to create a restore point. Unlike Zemana, it doesn’t give you an immediate option to say no to this. To wipe or quarantine the files, you will need to have the full product. Or, you can get a one-time activation code that lets you clean it up right away. In our case, the malware we downloaded began to rear its ugly head right before we got a chance to clean it, so we had to go through the process again after a clean wipe of the sandbox and delete it on a second try.
This is a good time to remind our readers that some malware will prevent you from deleting them. In those cases, you should run your malware cleaner from Safe Mode.
BitDefender Adware Removal Tool

BitDefender Adware Removal Tool is designed for annoying adware that could be bogging down your system.
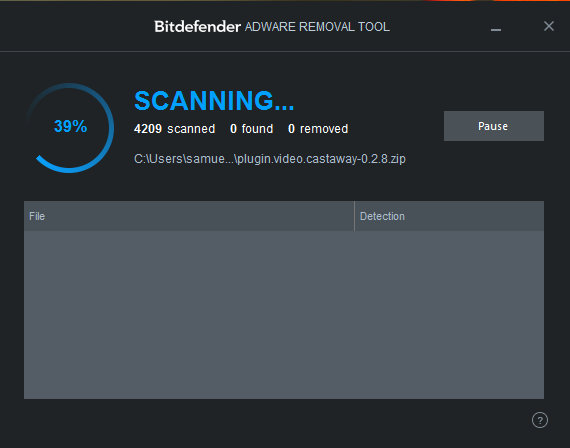
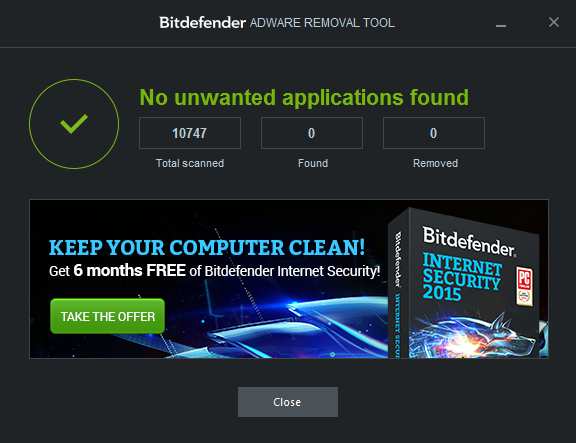
Go to the Adware Removal Tool download page
Download the free tool
Install the tool from wherever you save your downloads
Bitdefender Adware Removal Tool runs quickly and without the need for an installation. We ran this one after downloading a few malware. It did not find anything. However, we ran AVG immediately afterward, which did find two adware. Interesting. It may be that AVG simply labeled these as “adware” while Bitdefender did not consider them as such. Or it could be that Bitdefender simply missed the adware altogether. It’s difficult to be sure just from testing. However, it’s comforting to know that we could install and run Bitdefender fast, without the long download and extremely long scanning time that we found with AVG. Bitdefender took only a few minutes to run, in comparison to the 30 minutes with AVG. That said, as we’ve noted earlier, speed is not necessarily a good thing when it comes to virus removal.
AVG Antivirus

AVG is a well-known free antivirus program, malware scanner and malware removal tool. It is not the best antivirus on the market, even among free programs, but it does get the job done much of the time. The free program provides basic antivirus protection, while the full program provides an extensive amount of anti-malware and security features. The paid version is available with a 30-day free trial.
AVG is not a program you want to try to install if you have a particularly pernicious malware. As AVG is primarily a real-time antivirus software program, the installation process is a bit timely and it will need to install and update itself for a while before you can actually utilize it. In our testing, a few malware actually prevented our attempts at running the antivirus scan. A software like AVG is always going to run into this problem, as the scanning process can be slow, and some malware will simply work faster than your scanner can search the system and root them out.
To use AVG AntiVirus, do the following:Go the AVG virus removal download page
Download the free tool

Install the program from wherever you save your downloads
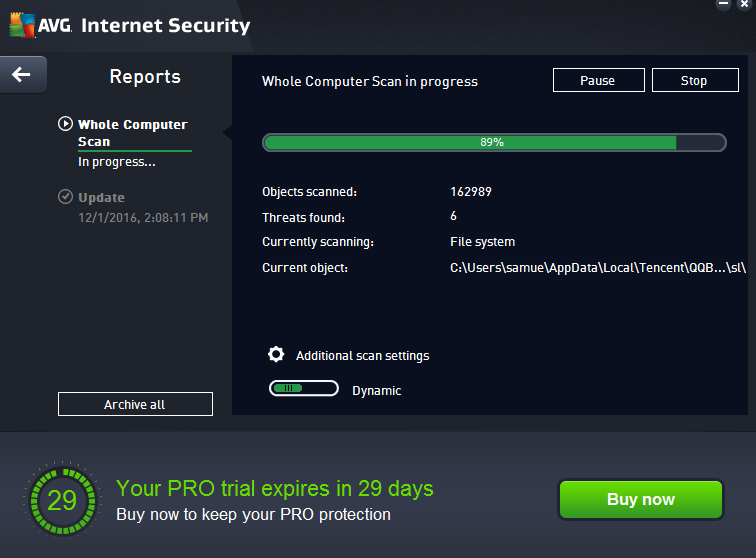
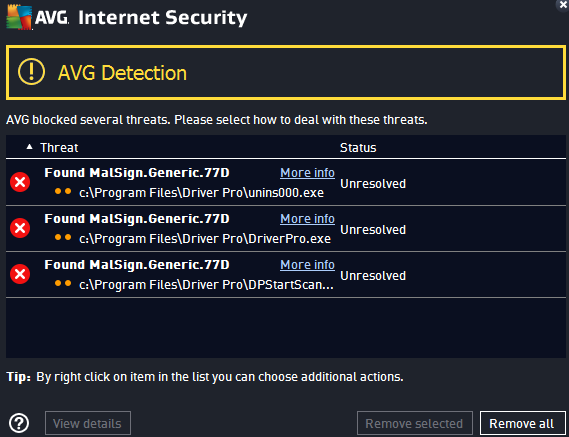
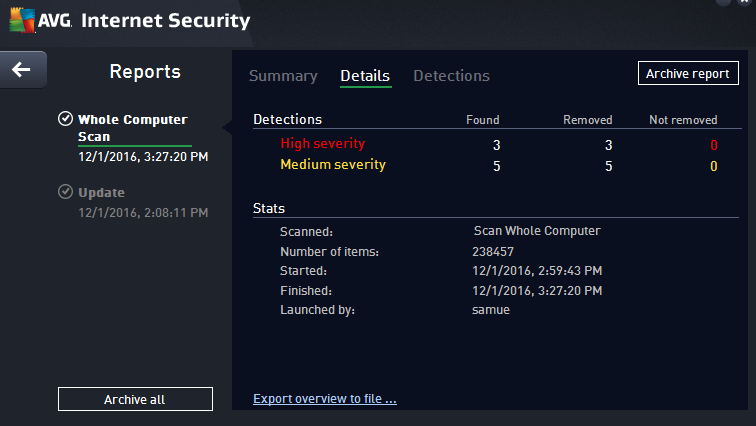
AVG AntiVirus took about 30 minutes to scan my entire file system. It located eight malicious programs on my system, including a trojan and a few adware that Bitdefender missed. AVG doesn’t automatically give you the option of what to do with the malware that it finds. You’ll have to go into the settings and adjust this yourself. If it finds it, it’ll clean it. This is not the case with its real-time monitoring, however. While we ran the virus scan, AVG also picked up 3 threats that were likely spawned from the malware on the system and cleared those out. The software works great for both the real-time and the on-demand features. You can also scan individual programs by right clicking them on your desktop, in case you feel any program might be just a bit suspicious.
AVG did not consider the EICAR test viruses as real viruses. It may be that the program is simply designed to ignore fake viruses like EICAR that don’t do anything. In comparison, Zemana picks up some of the EICAR files, although it does miss the couched zip files. This could mean that AVG’s search methods are more particular, while Zemana casts a wide net while missing some.
A word on Windows Defender
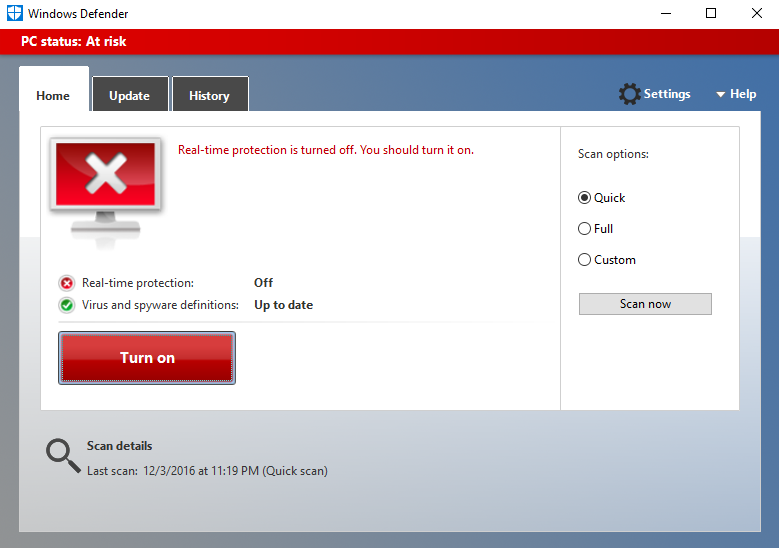
Windows 8 and beyond come bundled with what’s known as Windows Defender. This is Microsoft’s home grown anti-malware program. During our testing, we found that Windows Defender actually did a fairly good job of preventing us from downloading malware. In fact, in order to download any real or even test malware, we had to turn Windows Defender off, as the program would block all of our attempts with the various malware we tried to download.
Windows Defender will run real-time monitoring and system scans. Since it’s bundled with Windows, we also put it to the test at removing malware. It did a surprisingly good job.
A special note on ransomware
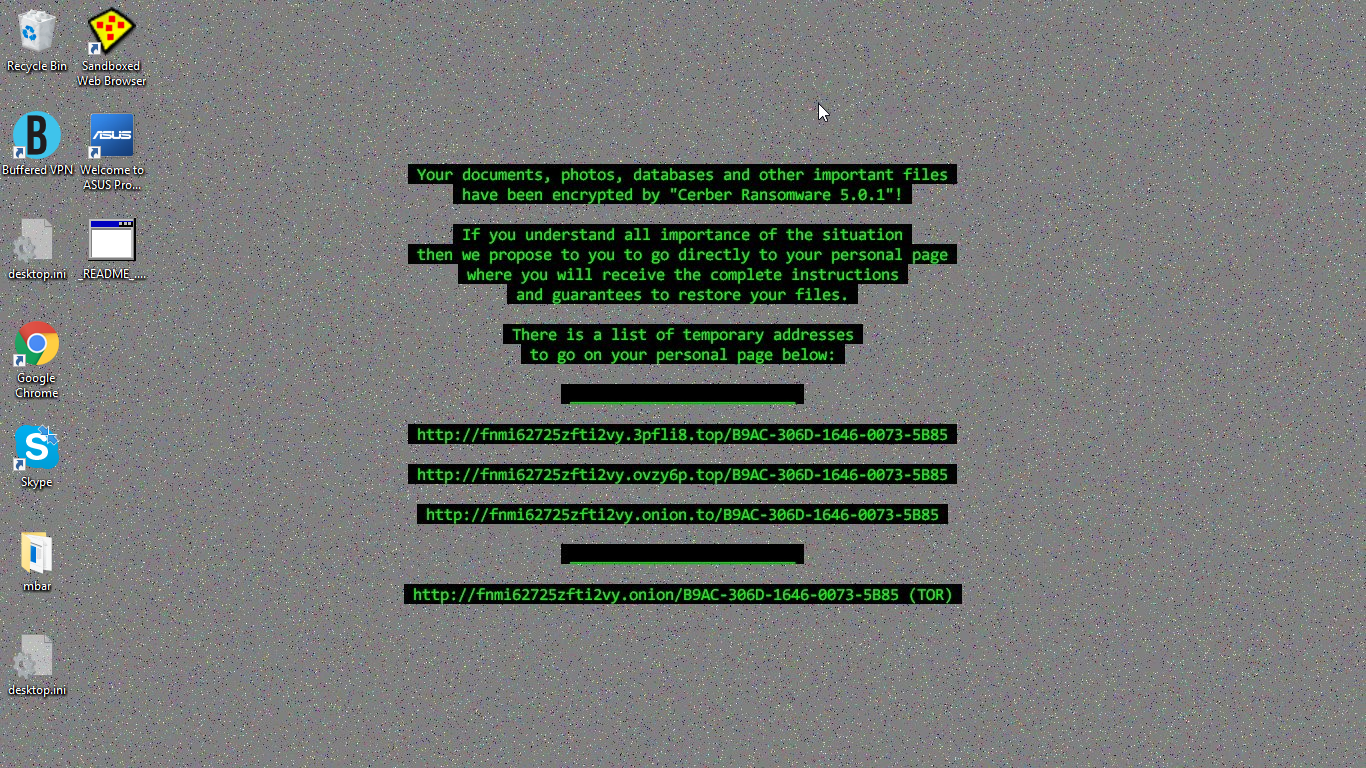
Ransomware is among the worst kind of malware you can get. During our testing, we downloaded one particular piece of ransomware that completely screwed up our system. So much so, in fact, that we couldn’t even finishing running Malwarebytes Anti-Rootkit. Ransomware will encrypt all of your files and often change the entire look of your user interface, forcing you to send money to a link in order to decrypt it. You usually have a set amount of time to click the link and send the money before it shuts down your system. Don’t give in. There are options.
Ransomware removal tools are designed for this purpose. These tools decrypt your files that have been encrypted by the ransomware. This won’t get rid of the ransomware — you’ll still need a malware removal tool for that — but you won’t have your files locked down. You can read more here on ransomware removal and prevention.
Both AVG and HitmanPro have such tools. While we did test out some ransomware with the rootkits, we did not at this time test to see if these tools effectively defeated the ransomware.
Avoid having multiple real-time antivirus programs
Antivirus programs work their way deep into your system. In a manner of speaking, many act very much like the malware they root out. This essentially makes it difficult for two real-time antivirus software to run on your computer at the same time.
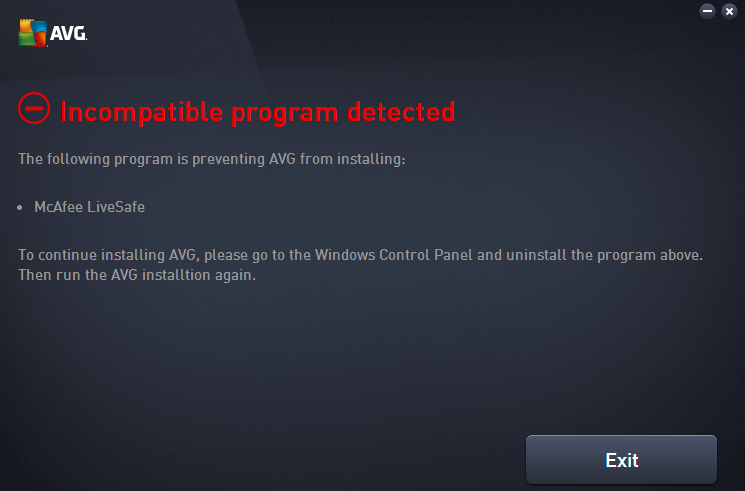
It may be tempting to try to run multiple real-time programs, as no one program will catch everything, but in most cases the programs won’t let you do this. For example, AVG will give you a conflict error if you try to install it while you have another program, such as McAfee, also installed:
This applies even if you have other programs installed but not monitoring. When they aren’t monitoring, these programs still maintain a presence deep in your system. Be sure to uninstall any real-time antivirus program you have installed before trying to install another one. The only exception to this is Windows Defender, which will exist on your system despite another real-time monitor, although it will automatically turn on or off depending on whether any other real-time programs are also on or off.
This note does not apply to on-demand malware scanners and removers. Many of these programs are run-only. They don’t get installed on your system, which many malware prevent, which is what allows them to operate despite the existence of malware designed to prevent antivirus removal attempts.
Conclusions: Time to prevent future malware/adware problems
The very second you clean your system of malware, we suggest taking preventative methods to ensure it doesn’t happen again. One suggestion might seem simple enough: Avoid websites where malware is likely to be found. A little discernment is needed on this one, as some websites may look like sketchville, when in reality they’re just a product of poor design. Meanwhile, some websites might look like a work of programming art but turn on your quickly as they fill up your computer with the worst kinds of malware imaginable.
For the most part, check the website’s security. Does it have SSL/TLS encryption? You can learn more about that through our extensive SSL encryption piece. In summary for that piece, SSL encryption is highlighted by a lock symbol on your web browser’s address bar and an “https” at the beginning of the web address. Only secure, verified websites can get the secure lock symbol and access to https, so it’s a good way to measure whether the website is safe.
If you’re intent on going to websites you know you shouldn’t (we won’t judge), you’re going to want to employ real-time monitoring methods. One simple method is through your own web browser settings. Every web browser has built-in security features to prevent you from accessing risky websites.
For Google Chrome, do the following:
Click on the three dots on the top right corner, and select Settings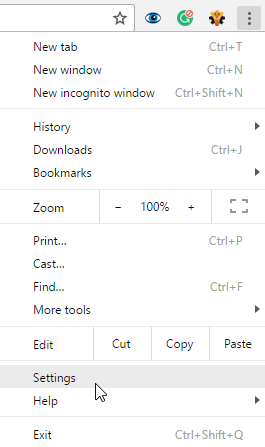
Click on Show advanced settings at the bottom (if they aren’t already shown)
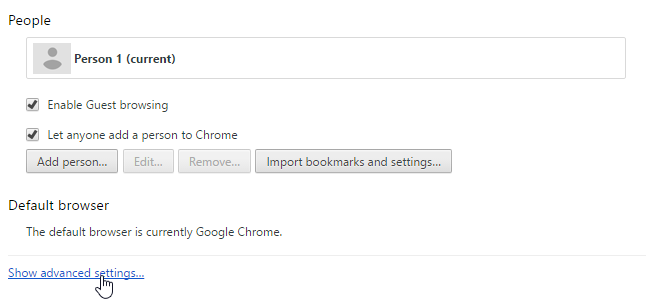
Under Privacy check the box to enable Protect you and your devices from dangerous sites

This will make most attempts to go to malware-laden sites result in this:

For Chrome, this is Google’s Safe Browser mechanism do its job to keep you from going to the wrong place.
For Internet Explorer, do the following:
Click on the cog wheel on the top right corner (Tools), then select Internet options.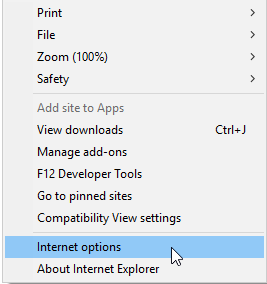
For Microsoft Edge, do the following:
Click on the three dots in the top right corner. At the bottom, click on Settings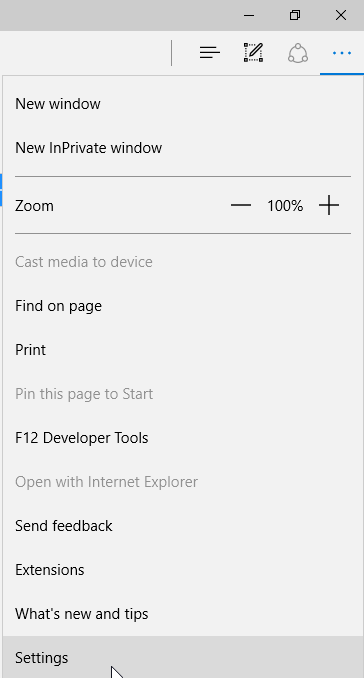
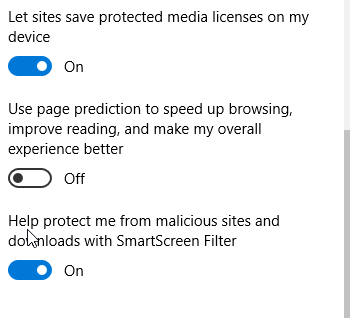
Scroll to the bottom and click on View Advanced settings

Scroll all the way to the bottom, and turn on SmartScreen filter
Microsoft has been using SmartScreen filter since Internet Explorer 8, so you can also find SmartScreen on that browser as well.
For FireFox, do the following:
Click on the three horizontal lines on the top right (Open menu)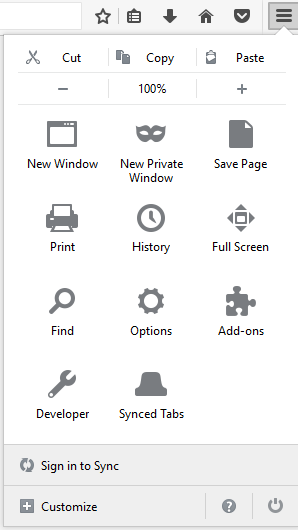
Get real-time antivirus protection and backup your system
Web browser security methods aren’t going to solve all of your problems. Your best solution to preventing malware from infecting your computer in the first place is by using real-time antivirus software. Windows 8+ users may opt for Windows Defender, as it’s good as far as free options go but you may also want to consider Bitdefender Total Security if you want a higher level of protection.
Bitdefender Total Security is one real-time antivirus software that goes above and beyond the type of protection you find with some of the more popularly-known and commonly used brands (McAfee, Symantec). As with all real-time antivirus software, it’s not perfect. It won’t catch every potential piece of malware. But it will catch by far the most; far more than Windows Defender and pretty much every piece of free software out there.
Finally, once you’ve cleaned your system, do a complete system backup, and schedule to have your system backed up at regular intervals. You also want to make sure you utilize automated backup software, as chances are good you’ll likely start forgetting to manually perform backups at some point. We’ve reviewed a fair number of online backup providers, and tend to recommend iDrive cloud backup. As a cloud backup service, iDrive is impressively effective, even offering 5GB of free backup, just in case you only need to backup part of your filesystem.
“Windows malware message” by Sumeet Basak licensed under CC BY 2.0